
Riello, Dialog Plus 70, UPS, no output repair
This unit was brought to me from Makis, a good friend with the complaint that it had no output.
The unit had no batteries in it when I received it for repair.
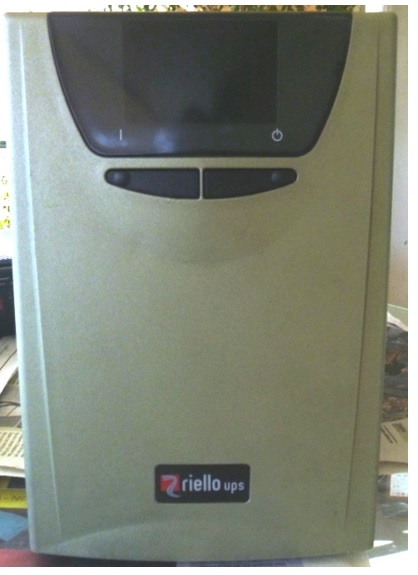
You can see its front view below
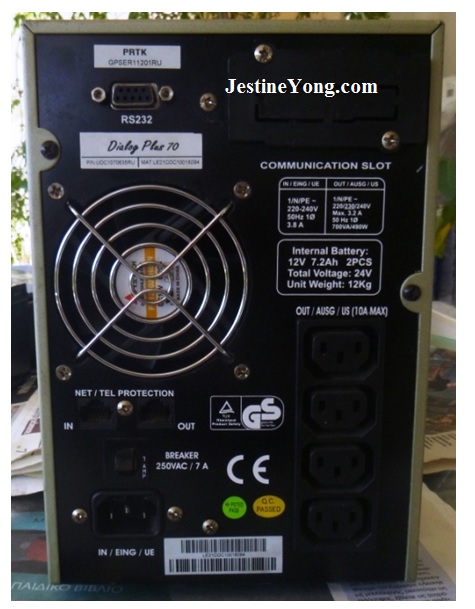
And its back view below
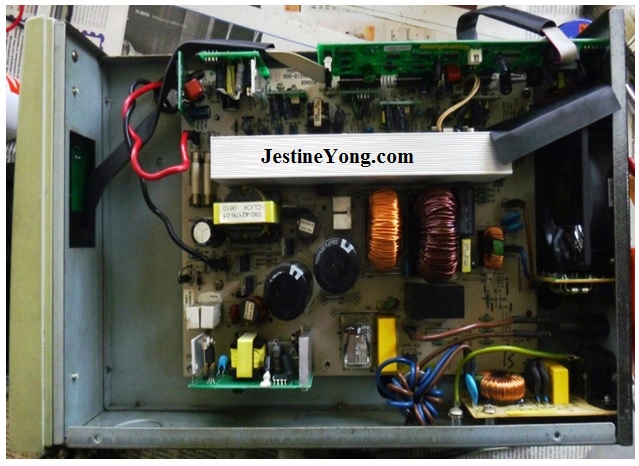
And this below is a side view with its main PCB along with all its auxiliary PCBs mounted vertically on it. On the opposite side is the batteries’ compartment.
When I connected two 12V test batteries in series to it and tried a first functional test of it, I only heard a long beep sound escorted by a red flashing warning light in its front panel display. Nothing more.
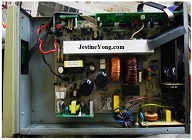
After that first test I removed the main PCB in order to inspect its solder side first. The view of it was not good at all. It was obvious that the unit suffered from electrolytic corrosion in some of the copper foil tracks of its main PCB. This below is the solder side of the main PCB after I had it thoroughly cleaned with cleaner spray and after the first repairing step as I further explain in the following text.
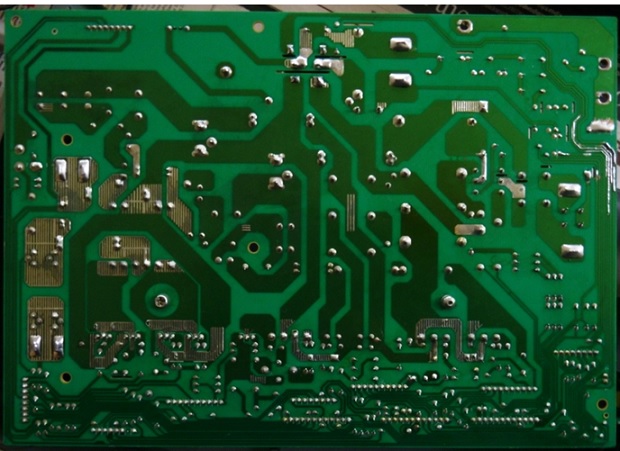
Now take a good look on the top-right side of this photo. You will easily distinguish my rework on these shiny parts of the PCB foil tracks. Their color was originally as dark as it is the color of these four tracks on the top-left side of the above picture in all their way as they leave the connector’s joints.
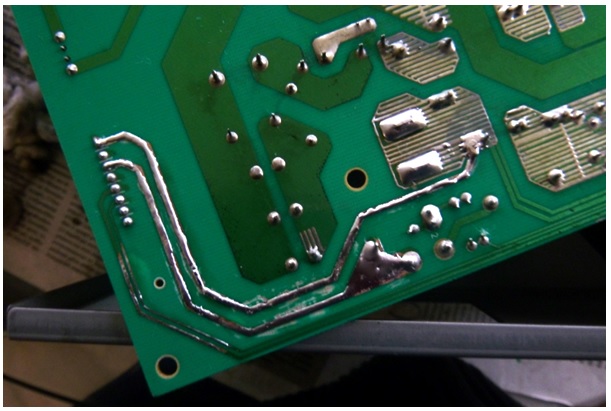
Below you can see in much higher detail the rework I did on the top-right side. You will also distinguish the “dead man” I “buried” in the external foil line, exactly at the curved part of it.
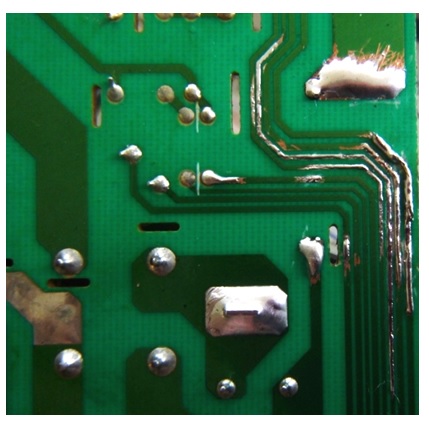
On the rest of them first I removed their over coating green paint layer and then I applied a fresh layer of tin on them. The external one had already completely lost a significant length of its copper foil which I replaced by burying tinned twisted copper strands over the missing copper track. (This procedure is known as the “dead man” technique).
When I ran a test on the unit after that, it worked normally. This non conducting foil track was connecting the coil of the main relay with the collector of the relevant transistor which controls it. And the contacts of this relay connect the internal power output stage of the circuit with the output connectors of the unit, located in its back side. This was the reason that the unit had no output. It had no other defects than these electrolytic corrosion problems which were already developed in significant degree. And this corrosion was caused because of the improper working environment of this UPS. Working in a small and always closed room with its ambient air being highly oily due to a leaky electromechanical device working nearby and the continuously re-circulating air within it through its cooling fan caused an accumulation of powder-like dirt similar to car exhaust deposits on the copper foil side of the PCB, exactly above these black colored tracks of the photo, which I finally repaired. This effect, over time, caused the aforesaid the corrosion of these copper tracks…
Needless to say that its fan was in the worst condition in terms of dirt on it. I dismantled the unit and washed it out with cleaner spray and re-lubricated it afterwards. What you see in the photo above, showing the back side of the unit, represents its condition after the repair and cleaning of it…
As you can easily understand I took this solder side photo of the main PCB before doing anything on its top-left side, on purpose. I referred to it in order to emphasize on the discoloring of the PCB foil tracks there. Look carefully the same area again, below
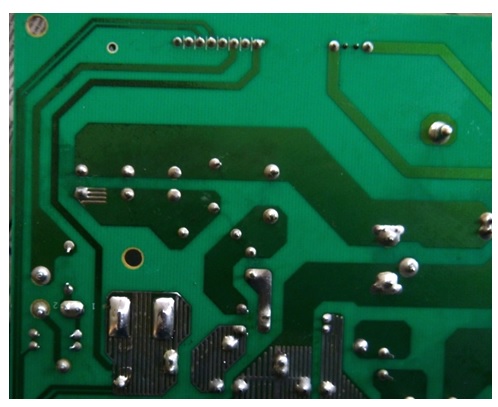
Can you distinguish the dark color especially the fourth foil track has (starting from the external one)?Look what happened to these foil tracks, beneath their paint layer, below
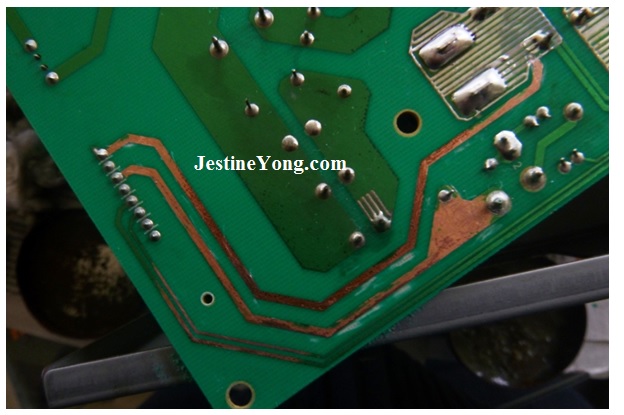
And this is how they look like after the rework I performed
Because of the high degree the corrosion problem had reached, I decided to check the front panel of the device as well. You can see it below
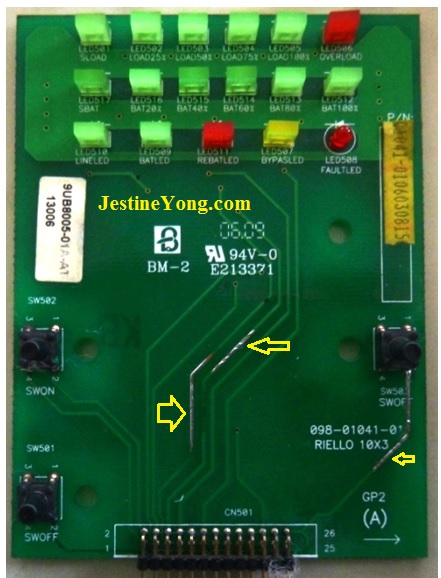
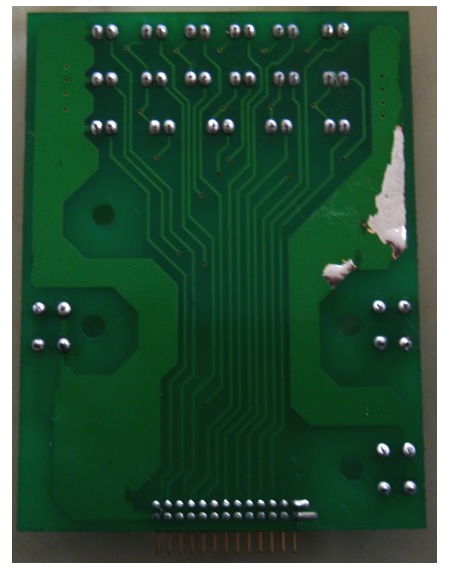
Here also, as you can see above, there were three more corroded foil tracks which I repaired by applying a layer of fresh solder tin on them again. I did the same at its back side. I refreshed all the solder joints of it and put a layer of tin in these parts on the right side of it where the thick ground foil track is.
After finishing the repair I put the unit in test operation connecting to it those two batteries I have for test purposes and waiting to see the proper charging process of them.

After this final verification which was free of any other problems, I reinstalled its top cover closing the unit. The repair was successfully over and this UPS was ready to be put in normal operation again making my good friend Makis very glad with its survival…
This article was prepared for you by Paris Azis from Athens-Greece. He is 59 years old and has more than 30 years’ experience in electronics repairs, both in consumer and industrial electronics. He started as a hobbyist at the age of 12 years and ended his professional carrier as a senior electronics technician. He has been a specialist in the entire range of consumer electronics repairs (: valve radio and BW TV receivers, transistorized color CRT TV, audio amps, reel and cassette tape recorders, telephone answering and telefax devices, electric irons, MW cooking devices e.t.c) working in his early stages at the official service departments of National-Panasonic first and JVC afterwards, at their premises in Athens.
Then he joined the telecoms industry, working for 20 years as field supporting technician in the sector of DMRs (: Digital Microwave Radio transmission stations), ending his carrier with this subject. Now he is a hobbyist again!
Please give a support by clicking on the social buttons below. Your feedback on the post is welcome. Please leave it in the comments.
P.S- If you enjoyed reading this, click here to subscribe to my blog (free subscription). That way, you’ll never miss a post. You can also forward this website link to your friends and colleagues-thanks!
Note: You can check out his previous repair article below:
https://www.jestineyong.com/10-ampere-d-c-analog-panel-instrument-repair/
 (155)Dislikes
 (0)
(0)
38 Comments
Leave a Reply


Yogesh Panchal
November 11, 2015 at 2:24 pm
Paris,
Good JOB Keep up sharing.
Paris Azis
November 12, 2015 at 1:47 am
Thank you Yogesh!
Greetings!
Parasuraman S
November 11, 2015 at 4:13 pm
Excellent root cause remedy carried by you! Very dedicated job, indeed! All the best!
Paris Azis
November 12, 2015 at 1:48 am
Thank you Parasuraman!
Greetings!
Anthony
November 11, 2015 at 5:43 pm
Hi Paris,
Another terrific repair article you have kindly shared with us readers here on Mr Jestine Yong's website. I always learn
something from your stories and am very grateful you pass on your great knowledge and experience here along with
the other kind technicians who also share their experience for us amateurs hobbyists to learn from ! I hope to continue reading many more of your articles Mr Paris in the future !
Kind Regards
Paris Azis
November 12, 2015 at 1:50 am
Anthony, thank you for your permanent support!
Greetings!
Suranga Electronics
November 11, 2015 at 7:15 pm
Excellent your knowledge job repairs.
Paris Azis
November 12, 2015 at 1:51 am
Hey Suranga, Thank you too for your kind words!
Greetings!
Hicham
November 11, 2015 at 9:31 pm
Hi Mr PARIS,
your repair post really very constuctive, keep it up.
Mr PARIS i need your opinion regarding the Blue esr is it better than Atlas70 esr meter?
waiting for your answer all my thanks.
Hicham
Paris Azis
November 12, 2015 at 2:14 am
Hey Hicham
Thank you for your supporting comment.
As regards the ESR meter, I admit that I cannot be objective since I already own a Blue ESR meter and I am fully satisfied with it and on the other hand I have never worked with the Atlas 70. All I know about it is what I have seen in “you tube”.
To be frank I bought this instrument just to make measurement comparisons with one analog ESR measuring circuit I built many years ago, which is in general excellent in its performance and I can use it even in high voltage circuits, up to 400V d.c, when these circuits are alive!
Best Regards
Robert Calk
November 12, 2015 at 12:30 pm
Also, with the Blue ESR Meter, you can check the ESR of your batteries.
Albert van Bemmelen
November 12, 2015 at 3:25 pm
Hi Robert. I understand that you mean batteries like car batteries too? I've never tested this because I always read to first discharge any Electrolyte capacitor before measuring it. And any batterie is charged of course. But I guess that warning to be careful mostly is valid when testing the special High Voltage types.
Paris Azis
November 12, 2015 at 5:06 pm
Please allow me Robert…Yes you can Albert but do not exceed 20V input voltage, because the input capacitor of this instrument works at 25V (as I remember).
There is no problem at all if you use it to measure 12V batteries.
Greetings!
Paris Azis
November 12, 2015 at 4:05 pm
Yes, this is very important too.
Thank you Robert. Although I have many times tested my car's battery (among many others) I forgot to mention that.
Greetings!
Robert Calk
November 13, 2015 at 5:15 am
You're welcome, Paris. Actually I meant smaller batteries like AA, etc, and phone, and other device batteries. I don't even worry about my car battery because if it is a few years old and starts acting up, I just replace it and don't waste time worrying about it.
I read about the Peak Atlas ESR analyzers and they didn't say anything about being able to test batteries. So I bought the Blue ESR meter.
Robert Calk
November 13, 2015 at 5:56 am
Also, here is a site people can go to and learn more about checking batteries: http://www.flippers.com/esrkthnt.html#battery
Albert van Bemmelen
November 14, 2015 at 9:30 pm
Thank you Guys! So if I keep under about 20 Volt on the Blue ESR inputs it will be safe. Good to know!
Albert van Bemmelen
November 11, 2015 at 10:16 pm
Hi Paris, I guess you only have happy customers since any device even in the worst state can be fixed by you!
It is safe to say that the paint layers do squat in order to protect the copper from getting corroded in this UPS.
While reading your article I noticed a word that I haven't seen used before and that was Aforesaid. I know what it means but I had to read it twice before I got it Haha.
Thanks again for this well in English written repair!
Paris Azis
November 12, 2015 at 2:38 am
Hi Albert
For the time being I have only happy friends. Customers I had in the past. Perhaps I will establish a professional repairs’ lab again in the future…This decision to be made depends exclusively on the amount of my pension, when it starts…
As regards corrosion of copper tracks, their dark coloring manifests their actual condition quite accurately. Then, all one has to do is exactly what I did…
Thank you for your kind words!
Best Regards
mike
November 11, 2015 at 11:11 pm
nice job Paris
mike
Athens GR
Paris Azis
November 12, 2015 at 4:07 pm
Thanks Mike.
Greetings!
randy
November 12, 2015 at 12:38 am
thanks for the rework article, nicely done. Here is a similar article on youtube that I found to be very helpful in reworking pcbs that have suffered from leaking electrolyte:
https://www.youtube.com/watch?v=vx50YtEC2S8
very in-depth and well presented, I hope to use this technique on a Tek TDS 540C that has multiple leaking SMD caps...
Paris Azis
November 12, 2015 at 4:10 pm
Thank you Randy.
Robert Calk
November 12, 2015 at 2:27 am
Nice job, Paris. Thanks for the article.
Paris Azis
November 12, 2015 at 4:12 pm
Robert, thanks again!
Mark
November 12, 2015 at 6:26 am
Well done Paris!
It is hard to decide when a unit is past it life span, but you have patiently carried out an excellent repair! Congratulations.
Paris Azis
November 12, 2015 at 5:01 pm
Hey Mark
On the contrary, it is easy to decide! You should only have in mind this “bath tube” shaped line the reliability engineers usually refer to.
The V axis expresses the number of failures, whereas the H axis expresses the age (time) of the product in years.
In the beginning of the life time of any product we have the so called “childhood deaths”, expressed by this line starting from a high point of the vertical axis and gradually falling along the horizontal axis and in progress of time, then it stabilizes at a very low level forming the strait line of the bottom of the tube, in parallel with the H axis, until it starts rising again in a symmetrical shape as its beginning one.
So at that second starting point, where failure rate starts rising over time, is the time decision point for the end of life of the product. I would put it a little bit higher, at the middle of this line (always theoretically speaking because this needs a minimum of record keeping about number of failures over time).
Practically speaking I would put this as failures per year rate, the decision based upon observation on this criterion.
All of it above was part of my job as a supervisor of the microwave links repairs lab of the company I served for the last twenty years. I had to assess the number of spare parts stock of the lab and this statistical work and relevant analysis of the data was part of my overall tasks…Nice days…
Thank you for your kind words.
Greetings!
Makis
November 12, 2015 at 7:21 pm
Thank you very much Paris!!!
Well done!
The UPS Works perfectly, is on load again!!!!!
excellent work!
Makis
Paris Azis
November 12, 2015 at 10:04 pm
Hey Makis
It had no other option but to work properly for you! Just because I wanted you to to feel happy about that!
My greetings to you!
reza
November 13, 2015 at 3:09 am
hi dear Paris Azis
very good
u are good repairman
good luck
Paris Azis
November 13, 2015 at 9:36 pm
Hi reza
Thank you for your kind words.
Best Regards
beh
November 14, 2015 at 12:35 pm
Hi Paris
thanks for sharing .
Paris Azis
November 14, 2015 at 11:41 pm
You are welcome beh!
Greetings
Paris Azis
November 14, 2015 at 11:55 pm
Hi beh
You are always welcome!
Greetings
Dan
November 15, 2015 at 3:40 am
I sure liked the details of what you did and how you found it. This give me a more insight to fixing my equipment. Thanks.
Paris Azis
November 17, 2015 at 4:07 pm
Hello Dan
Thank you for your supporting comment. I am glad that you get inspiration reading my writings.
Moreover I hope and also wish you to find the assistance you need to reach your own destination through this journey in the world of electronics…
Best Regards
Humberto
November 17, 2015 at 2:13 am
Hi Paris, another repair made with a lot of patient. Congratulations and keep up.
Paris Azis
November 17, 2015 at 4:11 pm
Humberto thank you for your kind words. Without patience there is no positive result not only in this job, but also in any other. At least this is what I humbly believe about that topic...
My greetings to you!