
Hyundai I20 Remote Key Repaired
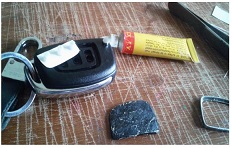
My elder brother came to my house and handed over to me his HYUNDAI I20 CAR REMOTE KEY which is damaged from key side rubber pad and asked me if I can arrange to get a new one.
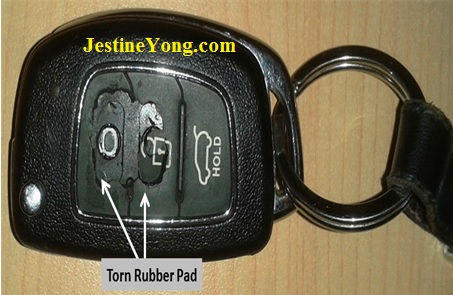
On visual observation I saw the rubber pad was badly torn.
So I have decided to just give a hand and try if something can be done without buying a new one.
So I kept the key with me and started my work next day as follows.
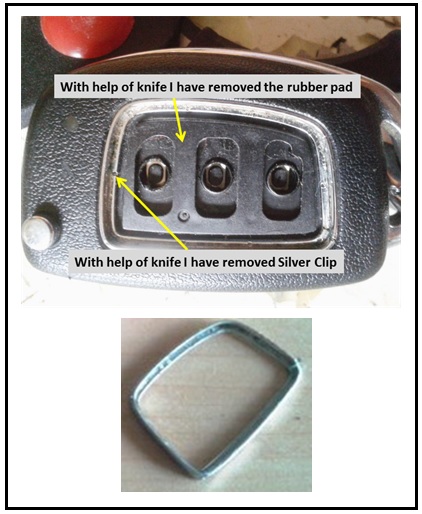
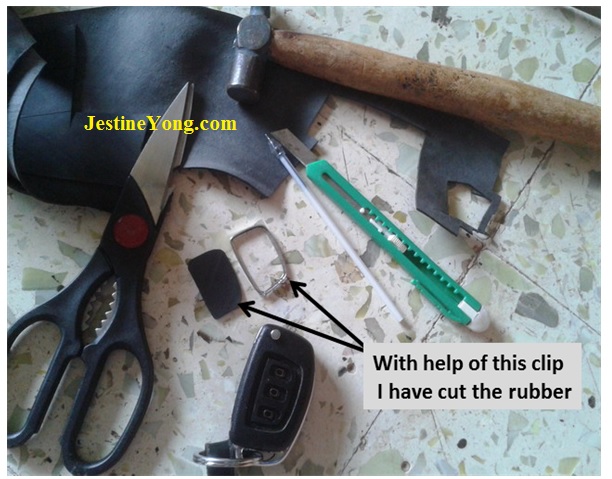
Now the question is from where to find the rubber pad? An idea came to use rubber pad from tire tube. You can also use tire tube for making washer for reducing vibration noise in computer with screw on HDD and cabinet FAN). Next I have removed the inner Silver clip with the help of knife for marking on Rubber for cutting.
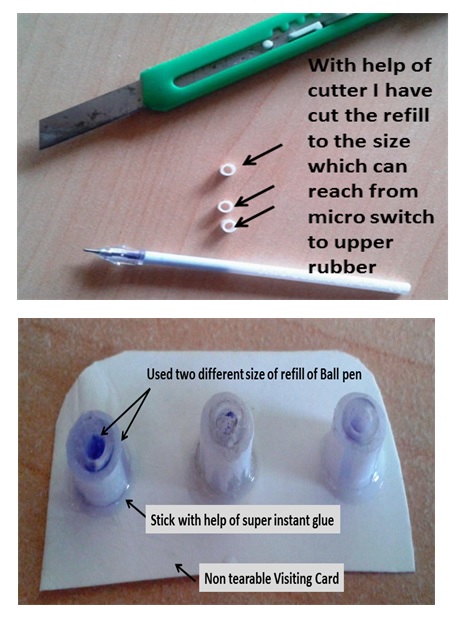
Now is the time to prepare the small cylinder (piston) where it can used to push the micro switch button. For this I have arranged two different size of Ball pen riffle, a non tearable visiting card, synthetic Rubber glue. With help of this material I made this thing.
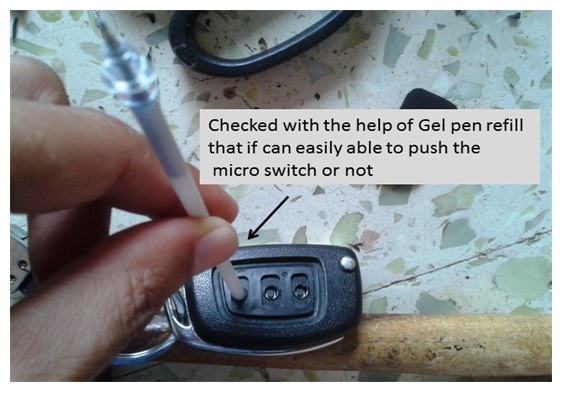
First I have checked with the help of Gel pen refill that work or not. Here I found that I can easily push the micro switch with help of this refill.
Next step I have made a small piston with the help of ball pen refill and cutter. And stick this piston on piece of non tearable visiting card which I have cut to the size which covers the hole of micro switch block.
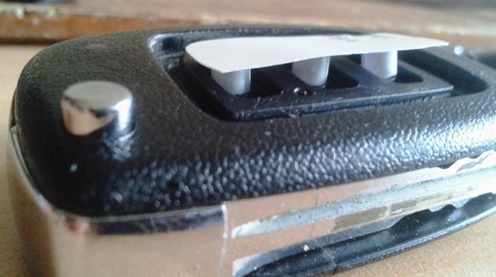
After that I have tried to test it to check if it was working smoothly or not. So by putting it on the unit I have checked and found this unit was working smoothly.
Now with the help of Synthetic rubber glue I have applied the glue on edge of Silver Clip and the groove from which we have removed the clip. Now I have attached the clip in the body and by applying glue on rubber pad I have done the finishing work.


Now the decorative work is depending on you and how artistic you are but the purpose is fulfilled. With this trick you can repair many kinds of remote control which uses RUBBER PAD.
This article was prepared for you by Yogesh Panchal who works as a Computer Hardware Engineer in Mumbai India.
Please give a support by clicking on the social buttons below. Your feedback on the post is welcome. Please leave it in the comments.
P.S- Do you know of any your friends who would benefit from this content that you are reading now? If so, forward this website to your friends or you can invite your friends to subscribe to my newsletter for free in this Link.
You can check his previous article below:
https://www.jestineyong.com/creative-sbs-240-computer-2-0-stereo-speakers-repair/
 (124)Dislikes
 (1)
(1)
18 Comments
Leave a Reply


Robert Calk
June 27, 2015 at 4:05 pm
Nice job improvising and saving the device, Yogesh.
Yogesh Panchal
June 30, 2015 at 11:57 pm
Thanks Sir,
Albert
June 27, 2015 at 5:07 pm
You had a lot of work in fixing the Remote Key Yogesh.
I understand that the switches still were okay since you fixed the rubber knobs on top. Such a repair is new to me.
I only repaired remote controls with silver glue or with thin aluminium foil when the switches failed working. Or I replaced the originally used membrane switches by microswitches. I also made the plastic of some Remote Controls as new again by using the thin needles that used to be in new Shirts. By kind of Welding the needles into the plastic with my solder station. So it even helped repairing the springy plastic parts. (Kind of like Iron in Concrete).
Cheers.
Albert.
Yogesh Panchal
July 1, 2015 at 12:04 am
Albert, Thanks for your comment.
Yes here micro switches were found Ok, just needed proper Rubber work.
Waleed Rishmawi
June 27, 2015 at 5:37 pm
great outside the box thinking. well done
Yogesh Panchal
July 1, 2015 at 12:05 am
Waleed thanks for comment.
Mark
June 27, 2015 at 8:54 pm
Gotta' give you an 'A' for ingenuity!
Yogesh Panchal
July 1, 2015 at 12:06 am
Mark thanks for comment.
marco tapia
June 27, 2015 at 9:23 pm
Very creative thinking, nicely done and nice details of your work, love the article. 🙂
Yogesh Panchal
July 1, 2015 at 12:06 am
Marco, Thanks for your comment.
Merlin Marquardt
June 27, 2015 at 10:15 pm
Very clever.
Yogesh Panchal
July 1, 2015 at 12:07 am
Thanks Merlin.
Joe Ayala
June 27, 2015 at 11:17 pm
Very unique and smart way to solve an immediate problem. Once again, necessity is the mother of all invention. Great job!!
Yogesh Panchal
July 1, 2015 at 12:08 am
You are right Joe , Thanks for comment.
Parasuraman S
June 29, 2015 at 12:10 pm
Vow! Superb craftmanship with precision and backed with advanced technical knowledge! Pl keep it up! All the best!
Yogesh Panchal
July 1, 2015 at 12:09 am
Sir, Thanks for your kind words.
Humberto
June 30, 2015 at 2:04 am
Good repair Mr. Yogesh, congratulations.
Yogesh Panchal
July 1, 2015 at 12:09 am
Thanks Humberto